Introduction #
This guide will walk you through the steps to integrate your Eats365 Point of Sale (POS) system with Pixalink’s loyalty program.
With this integration, you can:
- Automatically award loyalty points to customers when they make purchases.
- Enable credit top-up functionality directly through your POS system.
This helps streamline your operations while providing a seamless experience for your customers.
Benefits of Integration #
- Automatic Points Awarding: Loyalty points are automatically awarded to customers when transactions are completed in your POS system.
- Direct Credit Top-Up: Easily add credit to customer accounts directly from your POS system.
- Seamless Customer Experience: Deliver a smoother, more convenient experience for your customers by connecting your sales and loyalty systems.
- Efficient Management: Manage both your sales and loyalty program in one place, saving time and improving operational efficiency.
Prerequisites #
Before you begin the integration process, please make sure you have the following:
- An active Eats365 POS account
- Your Eats365 Restaurant Code
- An active Pixalink account
- Contact information for your account manager
Having these details ready will help ensure a smooth and efficient integration.
Integration Process #
Step 1: Connect Pixalink App in the Eats365 Merchant Portal #
Before configuring permissions, you must first connect the Pixalink app through the Eats365 Merchant Portal.
Follow these instructions based on the official Eats365 API Token Redemption Guide:
- Log in to the Eats365 Merchant Portal.
- In the left panel, click on Integration.
- Select Developer Portal Application.
- At the top right, click Connect New App.
- Enter the Production Token provided by your Pixalink account manager.
- Click Next to continue.
- Review the API project information, including App Information, Account Information, and the requested API Permissions.
- Click Confirm to grant permission to Pixalink.
- Once connected, Pixalink will appear under Developer Portal Application.
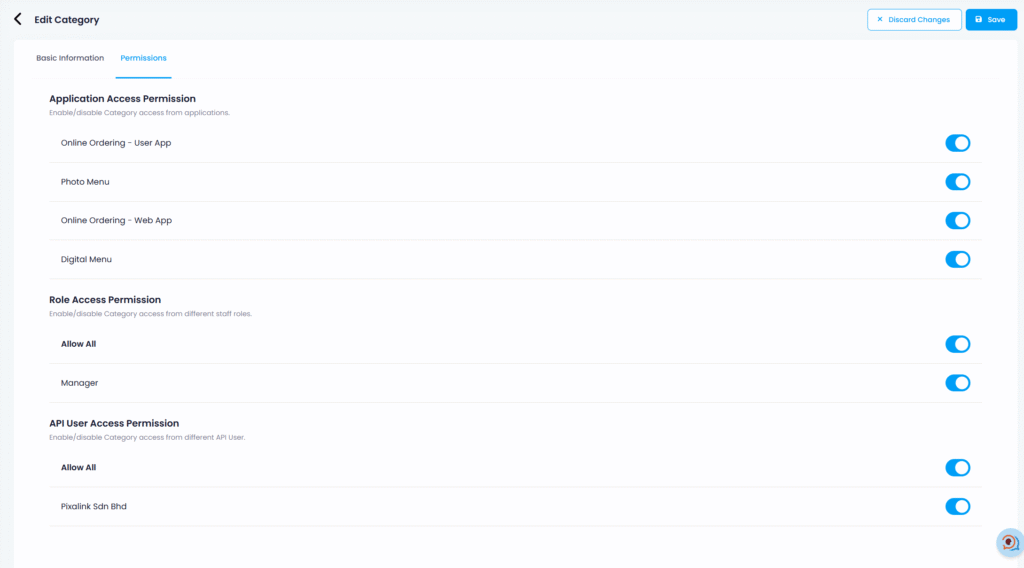
Step 2: Enable API User Permission in Eats365 (Optional: For Top-up Only) #
- Log in to your Eats365 Merchant Portal.
- Navigate to the Menu Setup section.
- Select Category, Create a new category “Credit Top-Up“
- In the API USER PERMISSION section, enable Pixalink Sdn Bhd by toggling the switch to ON.
Create Top-Up Items #
- Log in to your Eats365 Merchant Portal.
- Navigate to the Menu Setup section.
- Select Item from the menu.
- Make sure to have SKU Code
- In the API USER PERMISSION section, enable Pixalink Sdn Bhd by toggling the switch to ON.
- Also enable User Application and any other relevant permissions as needed.

Step 3: Contact Your Pixalink Account Manager #
After linking the Pixalink app in Eats365:
- Contact your Pixalink account manager.
- Provide your Eats365 Restaurant Code.
- Request your account manager to assign your restaurant in the Pixalink back office.
Step 4: Link Your Restaurant in Pixalink #
- Log in to your Pixalink account.
- Navigate to the Spaces section:
- Click on Spaces in the left sidebar menu.
- You will see a list of your restaurants (spaces).
- Find your restaurant in the list and click the Edit button next to it.
- Access the Configuration settings:
- Look for the Configurations tab.
(If you don’t see this tab, contact Pixalink Customer Support immediately.) - Under the Eats365 Integration Settings section, select your Restaurant Code from the dropdown menu.
- Look for the Configurations tab.
This step connects your Pixalink space to the correct restaurant in your Eats365 account.

Step 5: Enable Credit Top-Up Functionality (Optional) #
If you want to enable the credit top-up feature:
- Ensure your products in Eats365 have SKU codes assigned.
- In Pixalink, navigate to the Credit Top-Up Menu.
- Map your POS product items to the corresponding credit values.
- For example: Map a “Top Up 50” product in your POS to credit the customer with 50 points/credits in Pixalink.

Step 6: Enable 3rd Party CRM Integration (Most Important Part) #
- Contact your Eats365 support team or administrator.
- Request to enable the 3rd party CRM integration feature.
You will need to provide the following information:
- SID: This is a UUID generated by the system.
- Key: A personal access token. (Click the refresh icon to generate a new one if it’s not available.)
Important: When providing the Key to Eats365, make sure to add the prefix “Bearer ” before the token.
Example: Bearer your-access-token-here
You can find this information in the CRM Integration section of your Pixalink dashboard.

Verification #
To ensure that your integration is working correctly:
- Process a test transaction in your Eats365 POS.
- Check that loyalty points are automatically added to the customer’s account in Pixalink.
- If you are using the credit top-up feature, process a test top-up transaction and verify that the credits appear in the customer’s account.
Support #
If you encounter any issues during the integration process:
- Contact your Pixalink account manager for direct assistance.
- Reach out for help in your customer support WhatsApp group.
- If you do not see your Restaurant Code in the Edit Space, contact Pixalink Customer Support immediately.
Timeline #
The typical integration process takes approximately 2 weeks if no customization is required. For custom integration needs, please discuss with your account manager.
Resources #
For additional assistance, please contact your Pixalink account manager or customer support team.